Pages

Wednesday 27 January 2016

permission set

What is Permission Sets?
Permission set is also very similar to profile. What ever you can manage at profiles (Like Object permissions, Field Permissions, User permissions, Tab settings, App settings, Apex class permission, visualforce permission) the same you can manage here also. But the main difference between these two is that user can have only one profile and can have multiple permission sets at time.
So we can define profiles to grant minimum permissions and settings that every type of user needs, then we can use permission set to grant additional access.
Examples: 
1. We have many user in your organization with some fundamental job functions. We can assign all of then with one profile that grants them all access to do their job. But some set of people are working on special apps or some special functionality, for this type of special users we can create permission sets and can be assigned to them.
2. Some users need some temporary access to specific set of  fields and objects we can create permission set with those object & field access and we can assign that specific users.
Navigation: Setup -> Administer -> Manage users -> Permission sets
permission set

Profiles

What is profile?

A profile is a group/collection of settings and permissions that define what a user can do in salesforce. A profile controls “Object permissions, Field permissions, User permissions, Tab settings, App settings, Apex class access, Visualforce page access, Page layouts, Record Types, Login hours & Login IP ranges.
You can define profiles by user’s job function. For example System Administrator, Developer, Sales Representative.
A profile can be assigned to many users, but user can be assigned single profile at atime.
Types of profiles in salesforce
  1. Standard profiles: By default salesforce provide below standard profiles. We cannot deleted standard ones.
  Read Only, Standard User, Marketing User, Contract Manager, Solution Manager & System Administrator. 
  Each of these standard one includes a default set of permissions for all of the standard objects available on the platform.
  2. Custom Profiles: Custom ones defined by us. They can be deleted if there are no users assigned with that particular one.
Navigation: setup -> Administer -> Manage users -> Profiles
profile

Deployments in Salesforce

Deployments:
Moving changes from Sandbox to Production. We have 3 types of  Deployments.


        1. Change Set (if you want to keep track of what has been deployed & when)
        2. Using Eclipse
                  setup--->deploy --->SRC --->RC on Force.com----> Deploy
        3. ANT/ MAVEN


Deployments by using change sets?
      1. Create outbound change set in source organization and upload that change set to Target instance.
     2. In target instance go to inbound change set and go to the change set uploaded from source instance and deploy that change set.
For example you have done with your customizations in Developer sandbox. You are trying to deploy your changes from Development environment to TEST/PRODUCTION. In this case first create connection between DEVELPOPMENT Sandbox to TEST/PRODUCTION
 Once connection is established go to outbound change set and create one outbound change set in DEVELOPMENT sandbox and add list of components to that outbound change set. Next upload that change set to TEST/PRODUCTION. Next in your target instance go to inbound change set in TEST/PRODUCTION and deploy that change set.
What is inbound change set and outbound change set?
Outbound change set: An out bound change set is a change set created in Source organization and that you want to deploy to target organization.
Sending an outbound change set to another organization doesn’t guarantee that the changes will be implemented in that organization. The change set must be deployed (accepted) by the target organization before the changes take effect.
Inbound change set: An inbound change set is change set that is sent from source organization to the target organization. A change sent must be deployed for the changes to take effect. You can deploy the contents of an inbound change set as a whole, but not on a component-by-component basis.
To deploy your changes by using change set follow below steps
1. Set up -> Deploy -> click on “Outbound change sets”, you will navigate to following screen.
Change sets
Click on new button and provide required details name and description and click on save.
2. After saving you will navigate to following change set detail page. No you have to add your components to change set.
Change sets
Click on “add” button (which is marked in yellow color in above screen) to add components to your change set.
3. After adding all components to change set, click upload button to upload this change set to target organization. See the following image for reference.
Change Sets
Make sure that you have already established connection between source and target instance. If you are not established connection between source and target, follow the below steps to create connection.
Go to setup-> deployment connections -> select you target and click on edit -> and check the “Allow inbound change set” and click on save.
4. After uploading the change set go to your target organization and click on inbound change sets and click on the change set uploaded by you. See the below image for reference.
Change Sets
5. Next click on Deploy button to deploy your changes.
If you aren’t ready to deploy at this time, you can click Validate to preview deployment results without committing any changes. It isn’t necessary to validate before deploying, as the deployment won’t commit any changes if there are failures.
Change Sets
6. After the deployment you can see the status value with Deployed. And you can view the results. See the below image for reference.
Change Sets
If there are any failures you will get Status with Failure value and you can see error messages in View Results.
Note: By using change sets you can deploy 2500 components at a time.

Creating field dependency

What is field dependency?

Field dependency means, controlling a fields value based on the other field. For example, there are two fields called Country & State. I want to display only states related specific selected country when I select country.
More point about dependent fields
– The value selected in the controlling field affects the values available in the dependent field.
– A dependent field works in conjunction with a controlling field to filter its values.
–  We can define custom picklist fields as controlling or dependent fields.
– Standard picklist filed must be controlling fields. We cannot define standard picklist fields as dependent fields.
– We can define default values for controlling field. But we cannot define default fields for dependent fields.
– We cannot define multi-select picklist as controlling.
– We can define checkbox as controlling field only.
Below table may helps you to understand about which fields can be used as controlling & dependent fields.
Data Type Can we define as Controlling field Can we define as Dependent field
Standard Picklist Yes No
Custom Picklist Yes Yes
Multi-Select pick list No Yes
Checkbox Yes No
Creating a field dependency fields
To create field dependency
– Go to  setup menu and select the object you want to create field dependency.
– Click on filed dependency button & select controlling and dependent fields. See the below screen for reference.
Field Dependency 1
Click on continue and select dependent fields under controlling fields. click on include & then Save. see the below screen for reference.
Field Dependency2
Field dependency is created now. To test this go to Country field and select USA, In states you will get only States related to USA ( Alabama, Alaska, Delaware & Florida) as defined above.

Creating formula field

Creating formula field

What is a formula field? It is a read only field, the value of formula filed evaluate from expression defined by us. If we update any value in the expression, it automatically updates formula field value. We can create formula fields in both standard and custom object.
 We can return formule result in 7 ways those are:
1. Checkbox: Calculate a boolean value
2. Currency: Calculate a dollar or other currency amount and automatically format the field as a currency amount.
3. Date: Calculate a date, for example, by adding or subtracting days to other dates.
4. Date/Time: Calculate a date/time, for example, by adding a number of hours or days to another date/time.
5. Number: Calculate a numeric value.
6. Percent: Calculate a percent and automatically add the percent sign to the number.
7. Text: Create a text string, for example, by concatenating other text fields.
Creating this type of filed is like creating a normal salesforce field with type formula and we need to select result typed & provide expression.

Creating custom Fields

Creating custom fields in salesforcce

A field is like a custom Database column. Object field Store the data for our records. Salesforce by default provide few fields with salesforce standard objects  those are called standard fields. We cannot delete salesforce standard field. If we want we can change label name. The field created by us are called Custom field. We can delete custom field in salesforce.
Creating fields in salesforce
Path for creating field for standard objects
Setup ->Build -> Customize ->select object-> Click on field-> Go to the custom fields and relationships-> click on new button and create your custom field.
Path for creating field for Custom object
Setup->Build->create->object->select object-> Go to custom fields and relationship and create your field in custom object.
Important points About Custom fields
Changing the data type of existing custom field is possible but it may cause data loss.
Deleting a custom field removes both the data and field.
Custom field are stored for 15 days in recycle in after deletion.
If data is lost any list view based on the custom field will be deleted and assignment and escalation rules may be affected.
 

Creating a Custom Field in Salesforce.com, Step-by-Step


1. Click the “New” Custom Field button. The exact location of this button will vary, depending on the object you’re using. If you’re creating a custom field on a standard object, navigate to Build > Customize > [Object Name] > Fields and click “New.” If you’re using a custom field, navigate to Build > Create > Objects, scroll down to the Custom Fields section, and click “New.”
New Custom Field
Figure B1-1. Start the field creation process.

2. Select a field type.

Every field within Salesforce.com has an associated type. When you create your own custom field in Salesforce.com, you will need to define a field type. A field’s type (e.g., Number, Text, etc.) ensures that certain parameters and governing rules are enforced. It drives how users see and interact with the corresponding field. Salesforce.com provides a number of field types to choose from. The types available to you when you create a custom field are a subset of the full set of field types that exist in Salesforce.com; some types are only available via standard objects. Here’s a full list of field types for reference.
■ Note Relationship fields (Lookup, Master-Detail) have a more detailed creation process than the five-step process described in this section.

3. Configure the field attributes.

Each field that you create in Salesforce.com has certain attributes that need to be defined. There are obvious examples, such as Name and, in some cases, Length. Other attributes provide depth for fields and allow them to be used properly in a variety of scenarios. You will want to get familiar with these attributes before creating your own fields; they include:
  • Field Label: The name of your field that is displayed to users.
  • Field Name: The unique name of your field. Field Name is typically not shown to users,
    although it is possible to do so. Field Names can only contain alphanumeric characters and
    (nonconsecutive) underscores, must begin with a letter, and must end with a letter or number.
  • Description: The Description field is purely for reference, used to explain the purpose and/
    or context of the field you are creating. It is highly recommended that you always populate
    Description even if the reason you are adding a field seems obvious.
  • Help Text: The bubble text displayed to users upon hovering over a small question mark next
    to the field. Populating the Help Text field is not required and is most valuable when a user
    might have trouble understanding how to interact with or interpret a field.
  • Required: This Checkbox must have a legitimately formatted value present before a record
    can be created or saved.
  • Unique: By selecting the Unique Checkbox, you ensure that the field on a new or existing
    record cannot contain a value that matches that of the same field on another record. Unique
    can be configured to be case sensitive or case insensitive.
  • External ID: This Checkbox serves as a record identifier for a field in a system or application
    outside of Salesforce.com. External IDs have special behavior when corresponding records
    are imported, either via the standard import wizards or the Apex Data Loader. Note that the
    External ID by itself does not guarantee that the field values are unique in Salesforce.com—the
    unique attribute is a separate function.
  • Default Value: By setting the Default Value on a field, you can set an initial value on every
    record that is created. This value can be as straightforward as a string (“New”) or a number
    (“5”). However, it can also be a formula that uses Salesforce.
■ Note The attributes available for definition vary by field type. Certain attributes are only available when selecting a particular field type.

4. Set up field-level security.

Establish the permissions to your new field that should be granted to existing profiles. Once you have set the field type and configured the related attributes for your field, you will need to set the visibility of and access to the field across
the existing profiles. You have three options that can be applied. Table B1-1 is a matrix showing the Visible and Read-Only columns that you edit along with the CRUD (create, read, update, delete) equivalent of the corresponding combination.
Table B1-1. Potential Field-Level Security Settings
Potential Field-Level Security Settings
Keep in mind that field type (FLS) may or may not have a direct impact on a user’s experience. If a User does not have access to a particular record at all, full access via FLS does nothing to change that—the user still will not be able to see any of the fields on the record. Or she may be granted Read/Write access via FLS but a validation rule (these will be covered later in this book) may override that access and prevent her from editing the record. FLS, whether associated with a profile or a permission set, conveys the maximum access to a field that a user might have; the user might ultimately have less access based on other settings, but she will not have more access to the field than configured via FLS. Figure B1-2 is a look at the FLS settings page during custom field creation.
Setting the field-level security for your field
Figure B1-2. Setting the field-level security for your field

5. Add to page layouts.

The last step in the field creation process is only marginally helpful, and I’ll explain why. You are given the option to automatically add the field you are creating to any of the page layouts for the corresponding object. If you are creating a Lead field and four page layouts exist for Leads, you can add the Lead field to any of those four layouts at your discretion, as shown in Figure B1-3.
Setting your page layout options
Figure B1-3. Setting your page layout options
This sounds like a nice time-saver, doesn’t it? The problem is that you have no control over the field’s location within the page layout, just whether it is present or not. Fields added to page layouts through this means are always added as the bottom, left-most field in the first section on the page layout, as shown in Figure B1-4.
Appearance of a new field when added during the creation process
Figure B1-4. Appearance of a new field when added during the creation process
Except in the rare situation where you specifically want your field to appear in the bottom-left corner of the topmost
field section on your page layout, you will need to go into your layout and edit it to move the field to the desired
location. You may want to hold off on automatically adding a field to a page layout and just do it manually for two
reasons:
  • If you forget to update the corresponding page layout after creating it, your field will be in the wrong location.
  • You have to update the page layout anyway and you will have additional control if you handle adding the field and moving it all at once.
That’s it! You do want to spend some time thinking about your options before just breezing through the creation.
You can always change your field settings later, but it’s definitely easier to set up your field properly up front.
 

How do I customize my tabs?

How do I customize my tabs?

Edit Tabs

Edit Tabs
Click on the + icon to edit tabs.

Click on Customize My Tabs

Click on Customize My Tabs

Customize Tabs

Customize Tabs
From this screen you can customize the tabs that appear and the order that they appear in.
Once you have finished customizing the list of tabs in the right column, click Save.

Creating Objects and Tabs

Creating Objects and Tabs


Salesforce Objects

Objects are database tables that allows us to store data specific to organization in salesforce.
There are two type of objects in salesforce. They are.
1. Standard Objects : The objects provided by salesforce.com is called standard objects. examples of standard objects are accounts, contacts, opportunities, Leads, products, campaigns,cases, users, contracts,Report and dashboards etc…
2. Custom Object: The objects created by us are called custom objects. Custom objects store information that is unique and important to your organization. Custom objects are the heart of any application. Custom objects provide a structure for sharing data.
Custom objects have properties such as
– Custom fields
– Relationship to other object
– Page Layouts
– A custom user interface tab
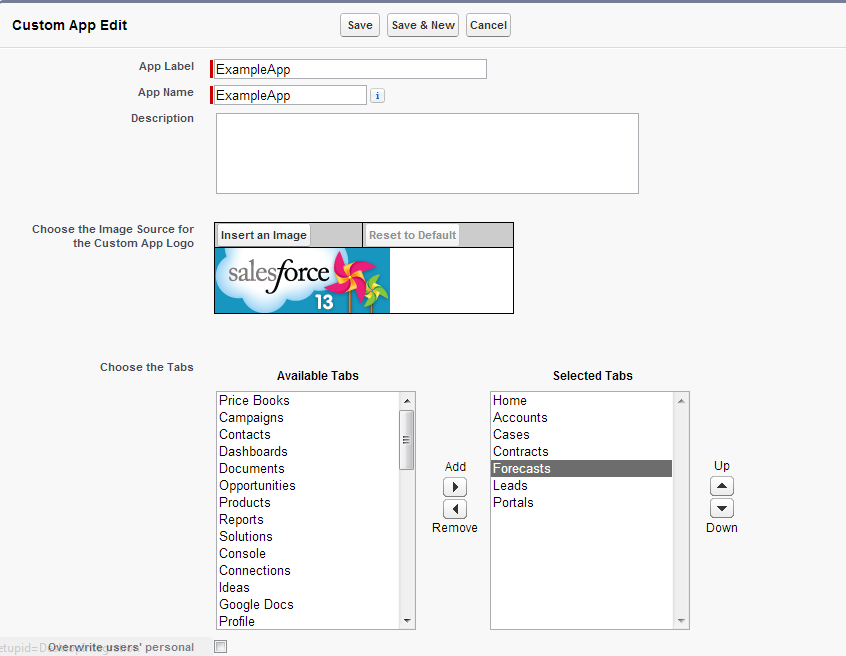
Creating Salesforce Custom Object
To create custom object go to Setup -> Build-> Create -> Objects ->Click on new custom object  button and enter label name, plural label and object name.
And also enter Record Name according to the data type. There are two data types available to create record name, those are
1. TEXT
2. Auto Number.
And also we have following optional features while creating object.
Allow reports: If we check this check box then only these objects are available to create reports.
Allow Activities: If we check this chis check box then we are able to create activities on this object.
Track Field History: If we check this check box then only we are to track fields. We can track up to 20 fields for single object.
And also we following deployment Status
In development: If we check this check box, this object is still in development mode. This object is not available for deployments.
Deployed: After selecting this check box then only it will be available for deployment.
The following options are available only when creating custom object first time.
Add notes and attachments related list
Launch new custom tab wizard after saving this custom object
After completing all the details click on save.
If we does not select “Launch new custom tab wizard” from object creation page, the object will save with out tab appearance. In this case we have to create tab for this object. If we select this check box the object will save and tab will be created and appeared.

Tabs:

Tab is a User interface to create records for object and to view the records in objects.
In salesforce we three types of tabs
1. Custom object Tab
2. Web Tab
3. Visualforce Tab
4. Lightening app Tab.
Path to create Custom tabs.
Setup -> Build -> Create -> Tab -> click on New tab and enter the details to complete the tab creation process.

Create salesforce Application

Create salesforce Application

Salesforce Application

  • A salesforce application is a logical container for all of the objects, tabs, process and services associated with a given business function
  • A salesforce application is a group of tabs that work as a unit to provide functionality
  • We can customize existing app to match the way to work or build new apps by grouping standard and custom tabs.
  • A force.com custom app consists of name, description, an ordered list of tabs and optionally a custom logo and a landing page.
  • Salesforce provides standard apps such as Sales, Call center, Marketing and Community etc….
  • Users can switch between apps using the force.com app drop-down menu at the top right corner of every page.
  • There are two types of salesforce application one is Custom App and other one is Service cloud console.

Create salesforce Application

To create application in salesforce follow below mwntioned steps.
Setup -> AppSetup -> Create ->apps -> Click on ‘New’ -> Select custom application radio button ->Provide the name of App -> click on ‘Next’ button ->select the image from document object  -> select the objects -> click on visible check box and save.
If we want to add this salesforce Application to any other profiles or add other tabs to this App we can do as follows
setup -> AppSetup -> create -> Apps -> select the App from the list and click on Edit -> If we want to change the image for the App click on ‘Insert an Image’ and take from documents. And if we want to add some more tabs to App we can select the Tabs from Available Tabs and clcik on ‘Add’ selected tabs will be moved to selected Tabs selection.
AppCreation1
If we want to add our new application to any profile we can check the check boxes showing in the below image.

AppCreation2

What is a View?

What is a View?

A view is a set of search conditions that display items that match the search conditions. For example, a view of contacts that have "Birthdays This Month" would filter your list of contacts based on a search for birthdays falling on a day in the current month.
By default, Salesforce.com includes a number of views for each category of items.

Views Included With Salesforce.com

Views Included With Salesforce.com
Here you can see a list of views for Contacts. Selecting any of these views and pressing the Go button will display a list of contacts that has been filtered based on the search conditions assigned to the view.
The list of views can be edited so your list may not look exactly the same.