Used to group values on the name given.it can be applied only on pick list, number, text fields
How To Create Bucket Fields In Your Salesforce Reports
Another great question has been asked to our certified Salesforce developers. The question was “how do I use bucket fields in my Salesforce reports?”
Bucketing lets you quickly categorize report records without creating
a formula or a custom field within Salesforce.When you create a bucket
field, you define multiple categories (buckets) that are used to group
report values. We have created simple step by step instructions on how
to create this report.
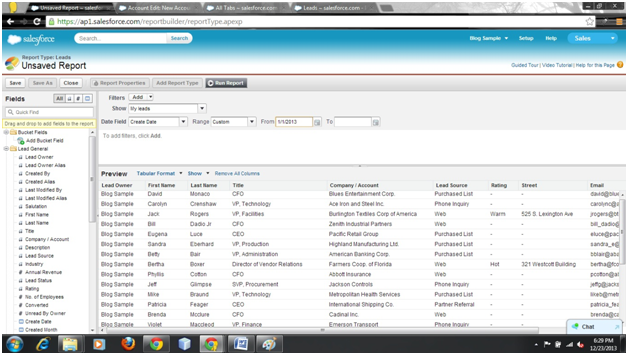
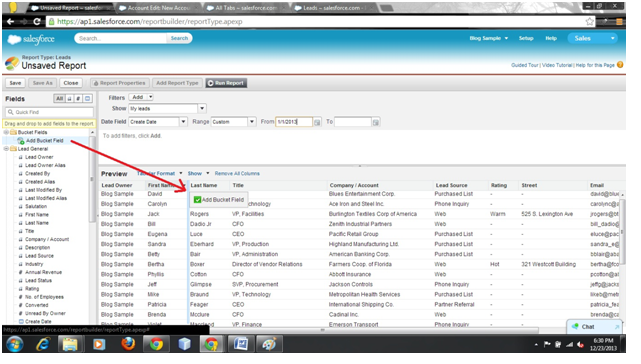
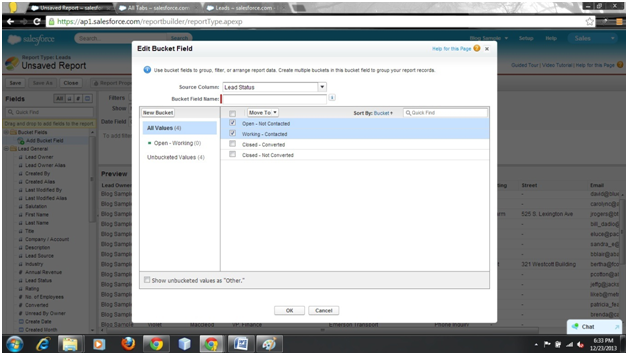
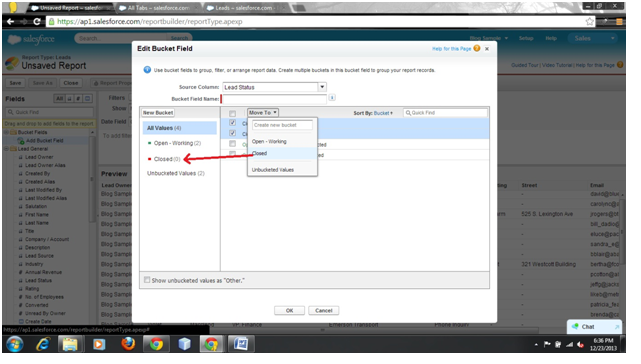
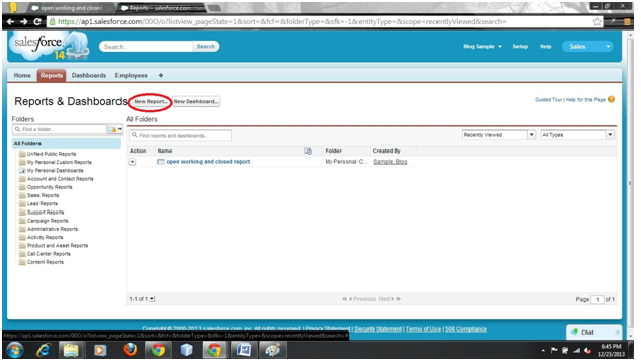
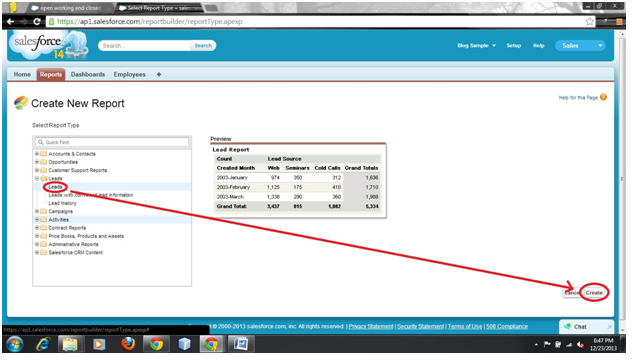
If you follow these step by step instructions for creating a bucket field in your Salesforce CRM: Step 1 – In the report tab click on the “New Report” button Step2 -Select a “Lead”and then create a new report ; Step3 - Here you will find the bucket field in the top of list of fields Step4 - Add this “Bucket Field” into your report Step 5 -Here you will get a popup window called “Edit Bucket Field”
Select the lead status in your source column
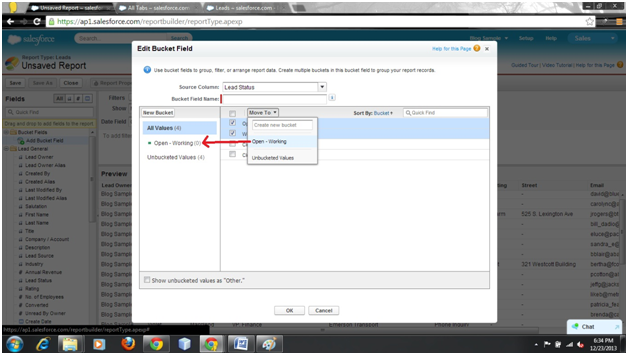
Click on the “New Bucket” button, create your criteria field “Open – Working”. Select two criteria “Open And Working” status Step6 - Move this field into “Open And Working” Criteria Step7 -Same process for close –converted and closed-Not converted field
Create a “New Bucket Closed” and drag these two closed fields into your closed bucket field
Click “OK” and then select the report as a “Summary Report” Step8– Lastly you will get your report which is separated on the basis of “Open-working” and “Closed” status of bucket field
Once you have created your report, creating dashboards is simply a
drag and drop job. One thing you do have to make sure of is that you
have created the correct report type. Tabular reports are not going to
work with the majority of components unless they have a row limit, then
then can work with chart or table components. The majority of the time
you are creating reports to work in dashboards you are probably going to
be working with summary reports as you are summarising a certain value
and then displaying these values in a bar chart, pie chart, pipeline
chart etc.
1. So to start off you need to navigate to the reports tab and hit
“New Dashboard” directly next to “New Report”. If you don’t have this
button here you probably don’t have the correct permissions, best thing
to do is get in contact with your System Administrator.
2. You will then see the layout design manager for your dashboard.
On the left hand side you will be able to see the different components
you can add to your dashboard. The top two starting from the left are
bar charts, a line graph, pie chart, doughnut chart, pipeline funnel,
scatter chart, gauge chart, metric and table. For a more detailed
explanation of each of these please see Salesforce description here. Ignore the bottom two
3. Once you have chosen your selected component you can simply drag
and drop it to your chosen column. This is the first step. The second
step is to populate that chart with some data. On the tab next to
components you will see datasources. This is a list of all your reports
in Salesforce. As a slight tip if you are building a big dashboard it is
best to create a new folder so everything is contained. Once you have
found your selected report you can simply drag and drop it onto the
component and you’re done!
4. The last step is to simply customise to your liking! If you click
on the little spanner within the component you will be direct to a page
with two tabs. You can change the Component data and formatting here as
well as a change of graph type.
Salesforce
Reports creation is very easy and we can reports in very less time.
Login to your salesforce organization and click on reports tab you will
navigate to below screen.
In the above image
– Report tab is used to navigate reports screen. when you click reports tab it will display above screen.
– Dashboard folder is used navigate list of dash board screen
– create new report folder is used to create new report folder
– Create new dashboard folder is used to create new dashboard folder
– Left side box shows list of available report/dashboard folders in
your org. By default salesforce will provide standard folders
– New report button is used to create new report and new dashboard button is used to create new dashboard.
To create new Salesforce Report follow below steps.
1. Click on report tab and then click in new report button. You will navigate to below screen
2. Select the report type ( which type of report you are creating ) and click on Create button. You will navigate to below screen.
In the above image left side panel shows list of available fields in
report type. We can easily add/remove fields to report by drag and drop
from left side panel right (report preview) side panel. In salesforce we
can create four types of reports. Those are Tabular, Summary, Matrix
and Joined reports. We can add filters to our salesforce reports.
3. Click on Save your report once you done with your report
customization(adding fields to report, selecting report format and
adding filters to your report). Enter madatory fields to save the
report, those are Report name and also select the report folder.
What is Dashboard?
Dashboard is the graphical representation of the data generated by a
report or multiple reports. Dashboard component types can be charts,
tables, gauges, metrics, or other components that you can create with
VisualForce.
You can add charts to your reports but dashboards give you more
options and also the ability to add up to 20 charts and tables on one
page for a quick view of multiple reports.
Below if an example of a dashboard. Here you can see each component
(graph or table) is directly linked to a report. If you are interested
the dashboard below was installed from the AppExchange and has a bunch
of CRM Dashboards created by Salesforce, you can grab it here.
In any business reports are very important. Reports will provide clear picture to the management.
Management
uses the reports to track progress towards its various goals, control
expenditure and increase revenue. Reports help to predict trends and
this is advantage of increasing profits.
In
Salesforce.com we can easily generate reports in different style. And
can create reports in very short time and also we schedule the reports.
Salesforce provides a powerful suit of analytic tools to help you
organize, view and analyze your data. In Salesforce we can Create 4 types of report formats 1. Tabula Reports: Simple listing of data without
any subtotals. This type of reports provide you most basically to look
your data. Use tabular reports when you want a simple list or a list of
items with a grand total.
Example: This type of reports are used to list all accounts, List of contacts, List of opportunities…..etc.…. 2. Summary Reports: This type of reports provide a
listing of data with groupings and sub totals. Use summary reports when
you want subtotals based on the value of a particular field or when you
want to create a hierarchically grouped report, such as sales organized
by year and then by quarter.
Example: All opportunities for your team sub totaled by Sales Stage and Owner. 3. Matrix Reports: This type of reports allow you to
group records both by row and by column. A comparison of related
totals, with totals by both row and column. Use matrix reports when you
want to see data by two different dimensions that aren’t related, such
as date and product.
Example: Summarize opportunities by month vertically and by account horizontally. 4. Joined Reports: Blocks of related information in a
single report. This type of reports enable you to adopt five different
blocks to display different types of related data. Each block can own
unique columns, summary fields, formulas, filters and sort order. Use
joined reports to group and show data from multiple report types in
different views.
Example: You can build a report to show opportunity, case and activity data for your accounts.
Salesforce approval process is an automated process and your organization can use to approve records in Salesforce, An approval process
is combination of steps for a record to be approved and person has to
approve it each step.A step can apply to all the records to that object
or just record that meets the certain criteria. An approval process also
specifies the actions to take when a record is approved, rejected, recalled, or first submitted for approval.
Simple or multi-step approval processes to automate and enforce the approval of virtually anything in your company.
Click on Create New Approval Process and choose Use Standard Setup Wizard from the drop-down button.
Note: If you want to create a basic approval process with default settings. Click on Use Jump Start Wizard.
Salesforce approval process Example
Salesforce approval process
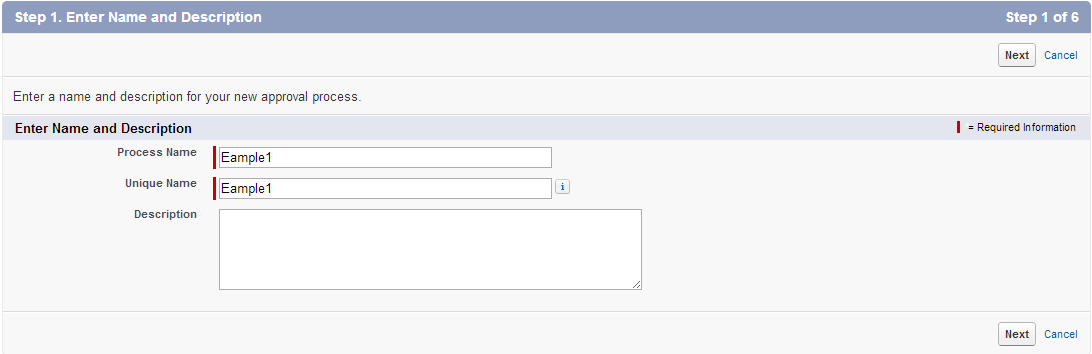
1) Enter name, Unique name and Description(Optional).
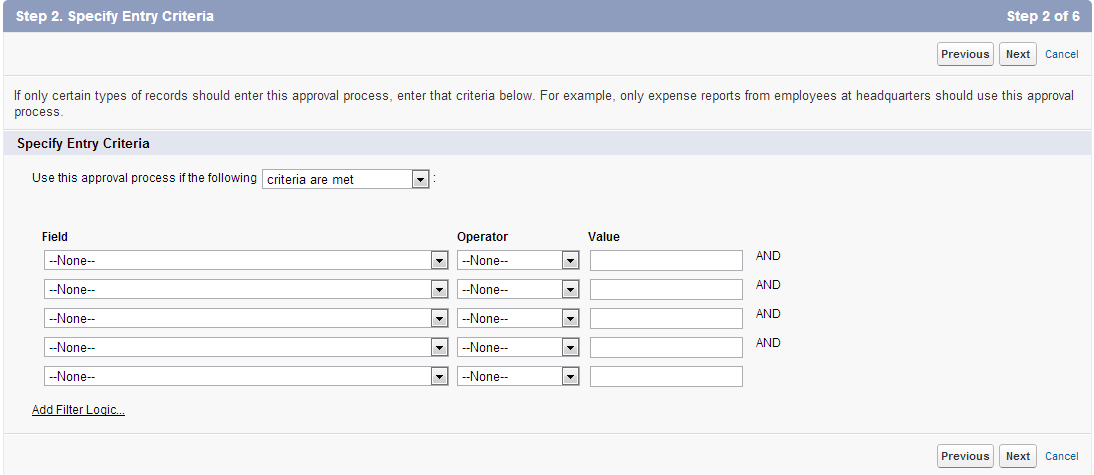
2) Select criteria are met if
you want to set a filter criteria that a record must meet to enter this
approval process. For example, if only employees from headquarters
should use this approval process to submit expense reports, enter the
following filter criteria: “Current User: Office Location Equals
Headquarters.”
Enter filter criteria for records that
you want included in this approval process. Leave the filter blank if
you want all records submitted to be included in the approval process.
Salesforce approval process
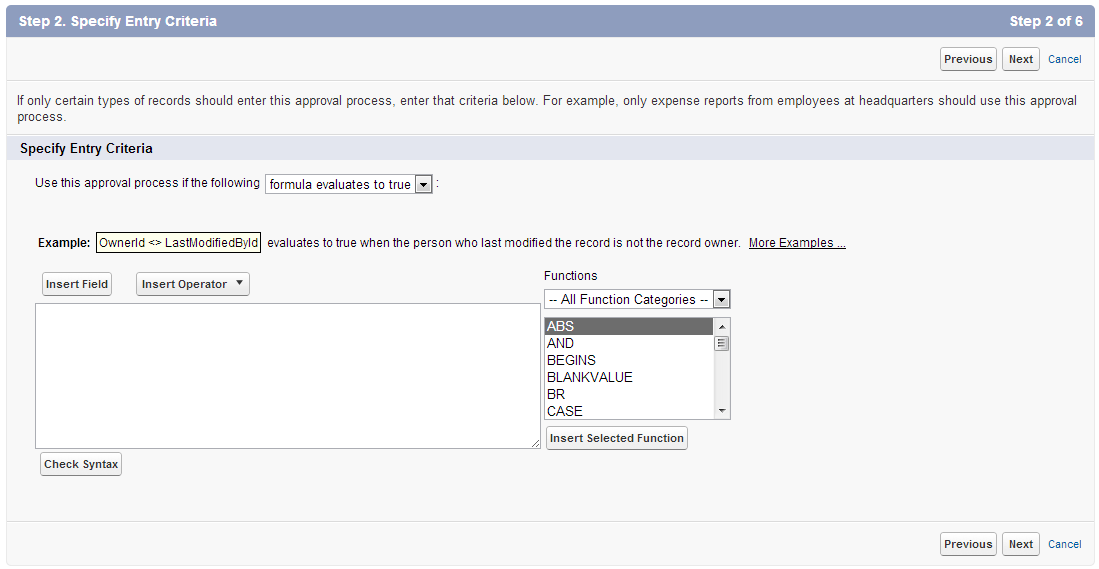
Select formula evaluates to true if you want a formula to determine what records enter the approval process.
Salesforce approval process
3) When you define
approval steps, you can assign approval requests to different users. One
of your options is to use a user field to automatically route these
requests. If you want to use this option for any of your approval steps,
select a field from the pick list below. Also, when a record is in the
approval process, it will always be locked– only an administrator will
be able to edit it. However, you may choose to also allow the currently
assigned approver to edit the record.
4) Define initial submission actions
New field update / email / task -> Conditions -> save. 5) Define approval steps
Manager step -> click on new approval step button -> provide
the name -> all record should enter this step -> select approver
manually and save.
Manager step -> click on new approval step button -> provide
the name -> all record should enter this step -> select approver
manually and save.
CEO step -> click on new approver step button -> provide the name -> enter criteria and save.
6) Final approval steps
New field update / Task / Email according to the field provide the condition and save . 7) Final Rejection actions
New field -> provide the conditions and save.
Once the salesforce approval process is activated no more steps can be added.
Initial submission default actions cannot be edited but final approval & rejection default actions can be edited.
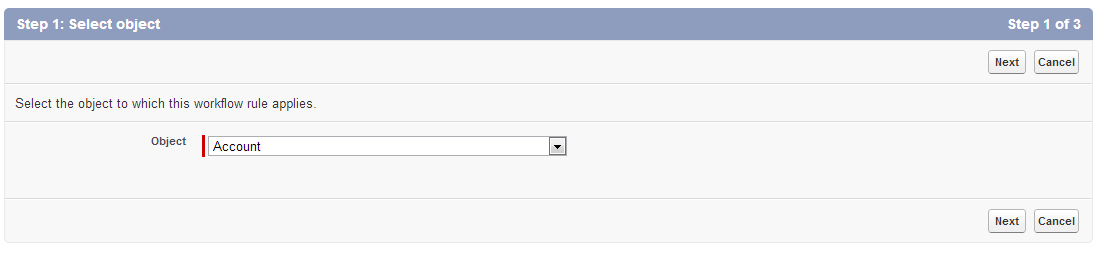
Select object which you want this workflow rule to apply.
Workflow
2) Clcik on ‘Next’.
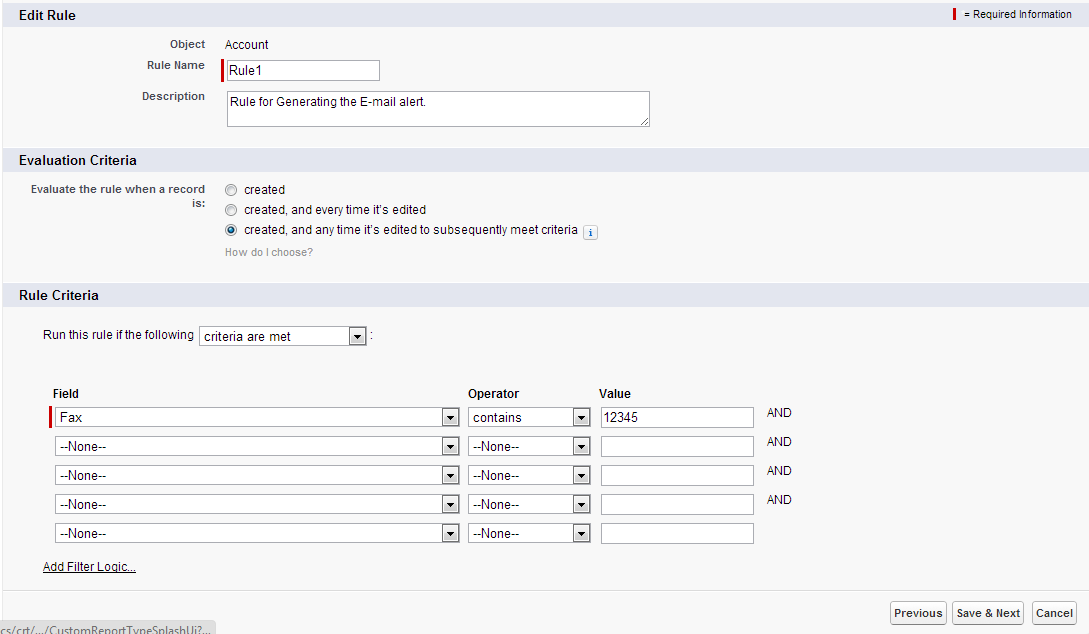
Enter a rule name.
Enter a description for the rule.
Set the evaluation criteria
Created
Evaluate
the rule criteria each time a record is created. If the rule criteria
is met, run the rule. Ignore all updates to existing records.With this
option, the rule never runs more than once per record.
Created, and every time it’s edited
Evaluate the rule criteria each time a record is created or
updated. If the rule criteria is met, run the rule.With this option, the
rule repeatedly runs every time a record is edited, as long as the
record meets the rule criteria.
Created, and any time it’s edited to subsequently meet criteria
Evaluate the rule criteria each time a record is created or updated.
For a new record, run the rule if the rule criteria is met.
For an updated record, run the rule only if the record is changed
from not meeting the rule criteria to meeting the rule criteria.
Enter your rule criteria
Run this rule if the following according to the criteria based on requirements.
Criteria are met: Select the filter criteria that a record must meet to trigger the rule.
Formula evaluates to true: Enter a formula that returns a value
of “True” or “False.” Salesforce triggers the rule if the formula
returns “True.”
3) Click on Save& Next.
Workflow
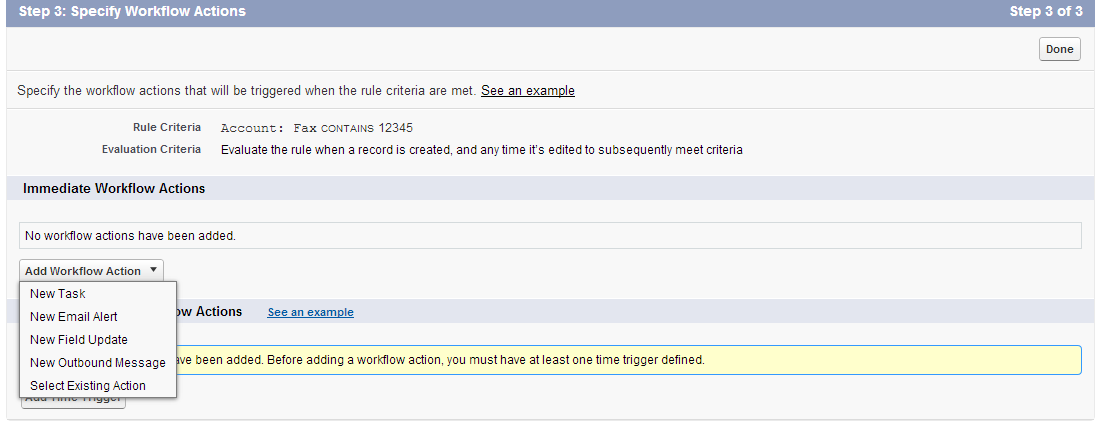
Possible workflow Actions for immediate workflow action:
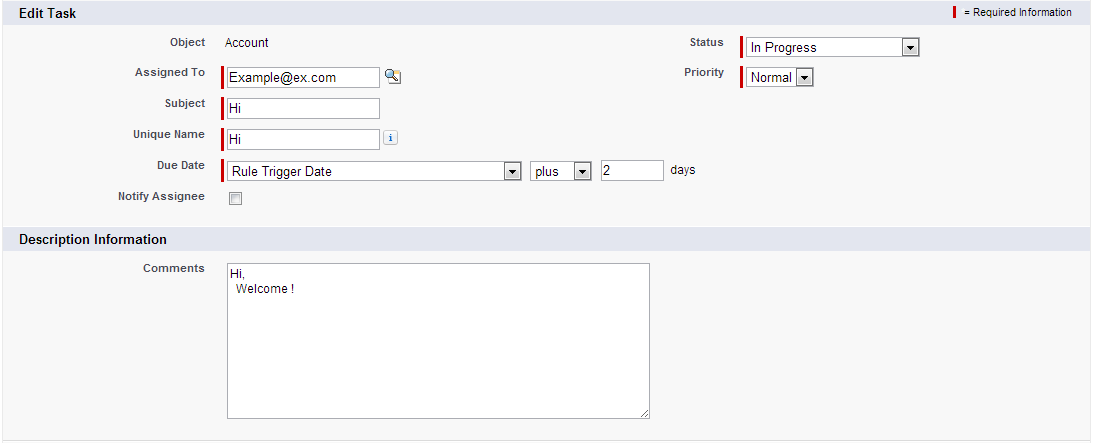
New Task to create a task to associate with the rule
Create a task to associate with one or more workflow rules, approval
processes, or entitlement processes. When changing a task, any
modifications will apply to all rules, approvals, or entitlement
processes associated with it.
Workflow
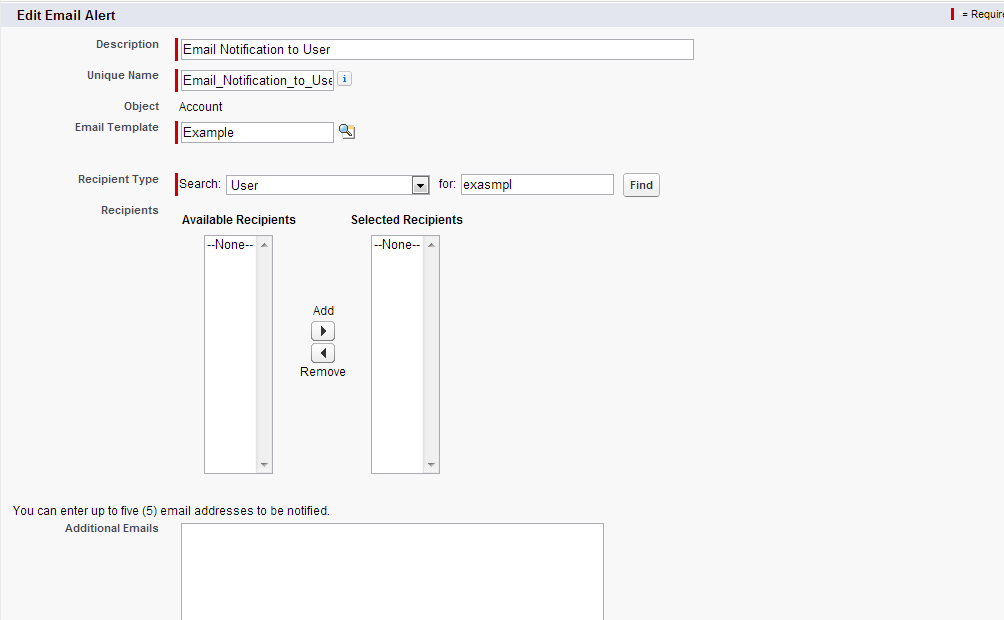
New Email to create an email alert to associate with the rule
Create an email alert to associate with one or more workflow rules,
approval processes, or entitlement processes. When changing an email
alert, any modifications will apply to all rules, approvals, or
entitlement processes associated with it.
Workflow
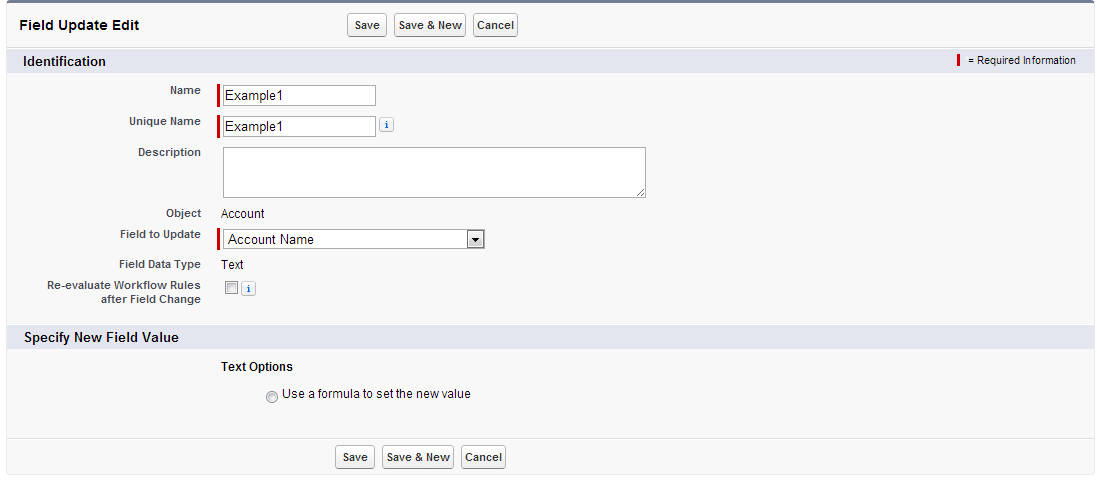
New Field Update to define a field update to associate with the rule
Define the field update, including the object associated with the
workflow rule, approval process, or entitlement process, the field to
update, and the value to apply. Note that the field to update may be on a
related object. Fields are shown only for the type that you select.
Workflow
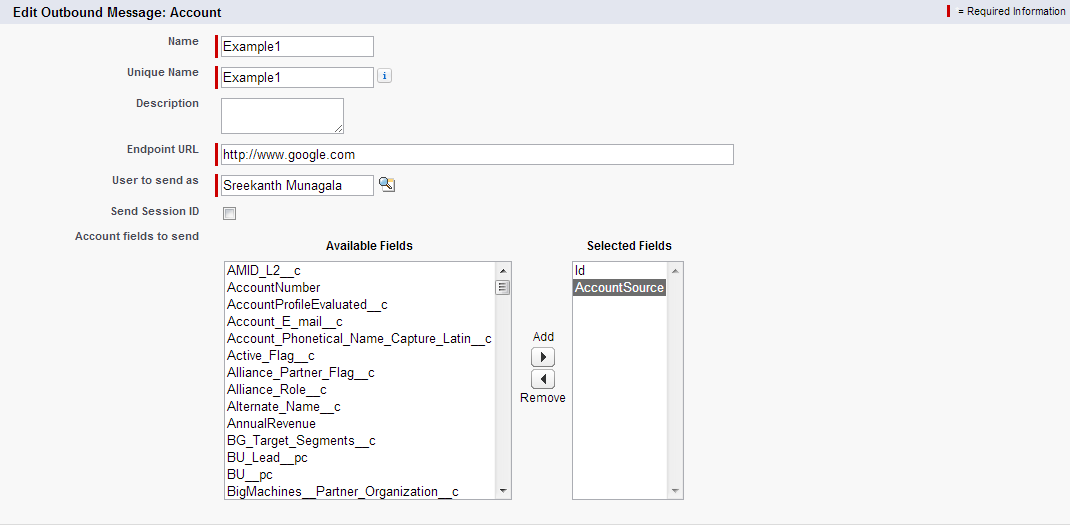
New Outbound Message to define an outbound message to associate with the rule
Enter the details of your outbound message and select the fields you
want included in this message. Note that the fields available depend on
the type of record previously selected.
Workflow
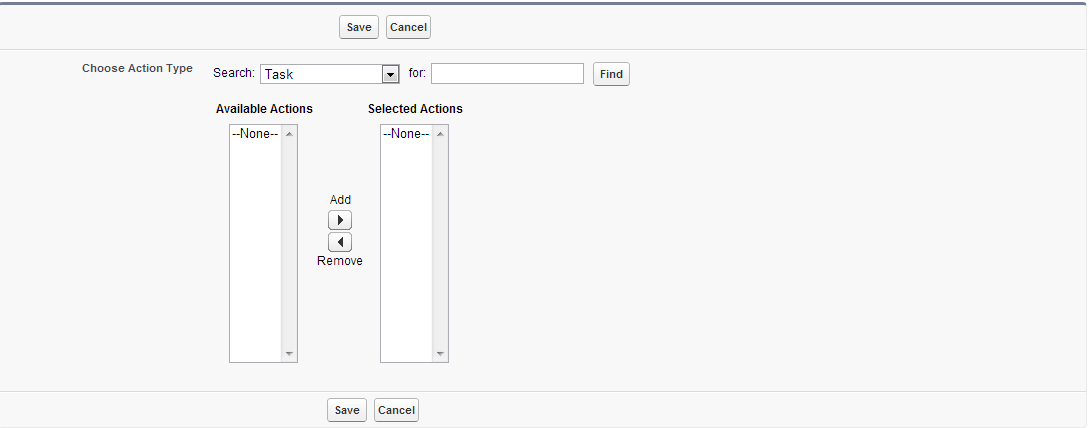
Select Existing Action to select an existing action to associate with the rule
Workflow
For Time-Dependent Workflow Actions workflow action
Click on Add Time Trigger
Specify a number of days or hours before or after a date
relevant to the record, such as the date the record was created or
modified.
Click on Save.
Workflow4) Configure additional immediate or time-dependent actions.
5) Click Done and Activate the workflow.
 ;
;